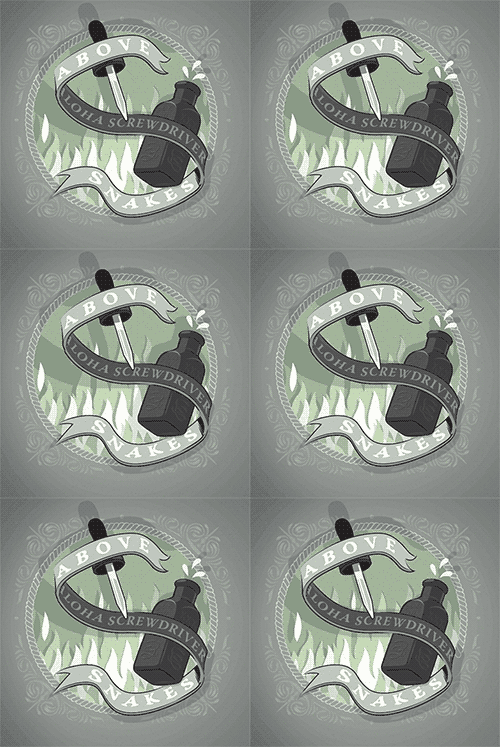
I made some album artwork recently for the sci-fi-surf-rock band Aloha Screwdriver. Their new EP is called "Above Snakes" and they were open to any interpretation of that. There's an undertone of western grit on this record and I thought maybe a traveling snake oil salesman theme might work. Then, for some reason, I got the idea that it should be in three dee. In the end, the band shipped the blue vinyl 7" record with red/blue glasses (the term for red/blue 3D is "anaglyph"). The front and back of the EP's sleeve features anaglyphic art that shows some depth when the glasses are on. Below are some sketches and a how-to for making 3D artwork using Photoshop.
How To Make an Anaglyph
There are a couple of different ways to make anaglyphs. One way to merge two images together from different vantage points to simulate the distance between your eyeballs. Another method is to have software shift the red and blue using what's called a "depth map". There are even apps that allow users to cut up a flat image into chunks and then adjust how far forward or backward to move the chunks. All of those ways are destructive to the final image and are usually done as the last step in the creative process. As it turns out, there's a much more flexible way to do this buried inside of Photoshop's 3D functionality. It's easy and I can't believe it's been right there for a long time. I gleaned most of this technique from this blog post by Stephen Petrany that shows how to create the 3-D still photograph effect popular in documentary films. If you find gaps in my how-to, check out Stephen's post.
Step One: Get Your Art to Photoshop
I make most of my digital art in Adobe Illustrator. It's really flexible and it allows all of the parts are easily scaled. I work in a lot of layers (see above) and when I'm ready to make this thing in 3D, Adobe is kind enough to make those layers available to me in Photoshop as well. So, if you work in Illustrator like I do, just make sure to have the document in RGB mode and choose Export from the File Menu. For the Aloha Screwdriver project, the end result was a printed record sleeve, so it needed to be high resolution. I chose 300ppi and made sure to select the "Write Layers " radial button. It should be noted that working with a 300ppi on an old-ass Macbook for three-dee manipulation is not a good idea. Most new machines can handle all of that, but my old Mac was chuggin'. I'm just putting that out there before we get too deep.
Also, you're going to need red and blue 3D glasses to do the anaglyph part of this tutorial. You can explore the 3D Photoshop stuff without them, but if I were you, I'd hunt down a pair just so that you can start making your own 3D art for cheap right away.
Step Two: Clean Up Layers in Photoshop
Before: Merging Layer Groups in Photoshop
After: Simple layers
The next thing I did was open the exported RGB file into Photoshop. Like I mentioned before, Illustrator wrote the layers and Photoshop brought them in but Photoshop likes to put imported vector art into folders. Before getting crazy with 3d, it's a good idea to simplify all of those folder layers first. So, I went through and chose "Merge Group" from the Layers options with each folder selected. That will make it much easier to organize things for the next steps.Free Windows 10 Product Key
Step Three: Photoshop's 3D Environment
Once my layers were nice and simple, it was time to get into 3D. I selected all of the layers in the Layers panel and then chose "New Mesh from Layer" in the top menu's 3D drop down. The first option in the sub-menu is "Postcard". That's the special sauce that makes this whole thing work. When you choose "Postcard", it turns each of your selected layers in to a 3D Layer. After the computer thinks for a second, each of the layers will be marked with a small cube icon to remind you that it's a 3D layer.
You'll also notice that the tools panel will get a little smaller and the work area will have perspective lines going back into space. It's a whole new Photoshop that's just been there waiting for you to mess with. It's weird!
Step Four: Command+E
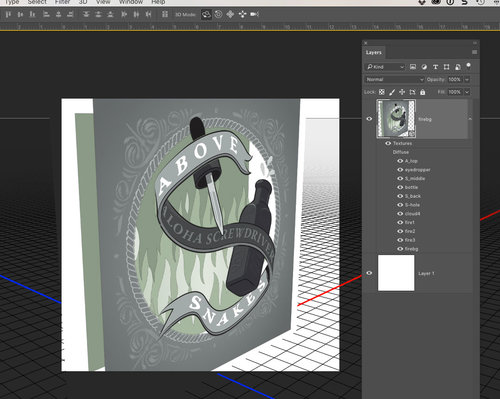
This is important enough that I thought it should be its own step. Basically, all of the layers need to be selected and then you have to hit Cmnd+E. This puts all of the 3D objects into one 3D Layer. Think of it like a deck of cards. This makes sure that all of the layers remain oriented to the same 3D space. After Cmnd+E is pressed, the computer will arrange the layers similarly to the way it arranged mine to the right. In addition to the "Layers" panel, you might notice that there's a "3D" panel with your layer names listed in reverse order. Make note of that panel for the next step.
Step Five: Move the Camera
The top item in the 3D panel is "Current View" and that's basically your movie camera. With "Current View" selected, you can begin to move the scene around with the Orbit, Roll, and Pan tools. Those are right up at the top of the screen in the top tool bar.
To get back to the default camera angle, open the Properties panel (Window>Properties). With "Current View" selected in the 3D panel, a number of different camera angle presets can be chosen from the "View" dropdown menu. If you're working on something really complicated and need to get back to a certain camera angle, you can even Save the position for later.
For my projects, I always choose the Orbit tool and move the camera to the upper right at an angle looking down. I even zoom out a little just to get enough room to start moving the layers around.
Step Six: Spread Out the Layers
By choosing the different layers in the 3D panel, I pushed and pulled the layers by grabbing the tip of the blue arrow. The green and red arrows allow for moving in the other directions as well. The handles just behind the arrows allow for the object to be tilted up/down or left/right. For the purposes of the demo, I just extruded the layers forward and backward in space.
It might be important to note that the layers in the 3D panel are listed from back to front, top to bottom.
Step Seven: Click the Anaglyph Button
It's really almost just that simple! Once your layers are extruded where you want them, change "Current View" to "Default" or "Front" in the Properties panel. The camera should then swing around to the front. In Properties, check "Stereo" and change the type to "Anaglyph". Depending on your file's resolution, you'll want to experiment with the Depth of Field settings. The best way to do this is trial-and-error while wearing red/blue glasses. Even better, with "Anaglyph" selected, Photoshop will stay in red/blue 3D mode while you made edits to the file. This is the biggest advantage of making anaglyphs this way. You can really adjust the layers to best effect and see it all while you work. AND you'll look super cool while doing it! Another great advantage of working this way is the ability to rotate your pieces left/right and forward/backward to create more interest. So, if you wanted to make a ramp or a slide, you could tilt a plane away from the camera. This is something that other methods can't do easily.
Step Eight: Details, Adjust, and Save!
Not all red/blue glasses are created equal. I found that I had to adjust the colors of my image to best fit the red and blue of my glasses. Sometimes adjusting the contrast can help too. If you want to dig a little further into the 3D environment, you'll quickly find that you can add light sources to your scene. I did this to add some shadows to the artwork. I think it really helped sell the depth. Maybe some things in your composition are see-through. It would be interesting to see how changes in transparency effects the depth.
I hope this tutorial helped. Making red/blue 3D is really fun for me it's just right balance of kitschy, arty, and nerdy. If you want to support more how-to blog posts like this and get some perks in the mail like pins and patches, consider supporting my Patreon campaign. I like Patreon a lot but if it's not your thing, maybe buy something from my shop! OR, if you see me in person, I accept high-fives and cheap beer. See you next time.Windows 10 License Key


没有评论:
发表评论