2017年7月4日星期二

How to create impressive red and blue 3D effects in Photoshop


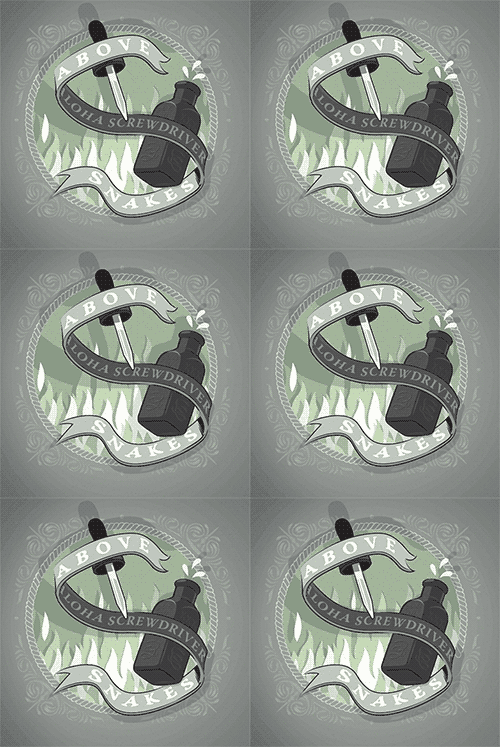
I made some album artwork recently for the sci-fi-surf-rock band Aloha Screwdriver. Their new EP is called "Above Snakes" and they were open to any interpretation of that. There's an undertone of western grit on this record and I thought maybe a traveling snake oil salesman theme might work. Then, for some reason, I got the idea that it should be in three dee. In the end, the band shipped the blue vinyl 7" record with red/blue glasses (the term for red/blue 3D is "anaglyph"). The front and back of the EP's sleeve features anaglyphic art that shows some depth when the glasses are on. Below are some sketches and a how-to for making 3D artwork using Photoshop.


How To Make an Anaglyph

There are a couple of different ways to make anaglyphs.  One way to merge two images together from different vantage points to simulate the distance between your eyeballs. Another method is to have software shift the red and blue using what's called a "depth map". There are even apps that allow users to cut up a flat image into chunks and then adjust how far forward or backward to move the chunks. All of those ways are destructive to the final image and are usually done as the last step in the creative process. As it turns out, there's a much more flexible way to do this buried inside of Photoshop's 3D functionality. It's easy and I can't believe it's been right there for a long time. I gleaned most of this technique from this blog post by Stephen Petrany that shows how to create the 3-D still photograph effect popular in documentary films. If you find gaps in my how-to, check out Stephen's post.

Step One: Get Your Art to Photoshop


I make most of my digital art in Adobe Illustrator. It's really flexible and it allows all of the parts are easily scaled. I work in a lot of layers (see above) and when I'm ready to make this thing in 3D, Adobe is kind enough to make those layers available to me in Photoshop as well. So, if you work in Illustrator like I do, just make sure to have the document in RGB mode and choose Export from the File Menu. For the Aloha Screwdriver project, the end result was a printed record sleeve, so it needed to be high resolution. I chose 300ppi and made sure to select the  "Write Layers " radial button. It should be noted that working with a 300ppi on an old-ass Macbook for three-dee manipulation is not a good idea. Most new machines can handle all of that, but my old Mac was chuggin'. I'm just putting that out there before we get too deep.

Also, you're going to need red and blue 3D glasses to do the anaglyph part of this tutorial. You can explore the 3D Photoshop stuff without them, but if I were you, I'd hunt down a pair just so that you can start making your own 3D art for cheap right away.

Step Two: Clean Up Layers in Photoshop

Before: Merging Layer Groups in Photoshop


After: Simple layers

The next thing I did was open the exported RGB file into Photoshop. Like I mentioned before, Illustrator wrote the layers and Photoshop brought them in but Photoshop likes to put imported vector art into folders. Before getting crazy with 3d, it's a good idea to simplify all of those folder layers first. So, I went through and chose "Merge Group" from the Layers options with each folder selected. That will make it much easier to organize things for the next steps.Free Windows 10 Product Key

Step Three: Photoshop's 3D Environment


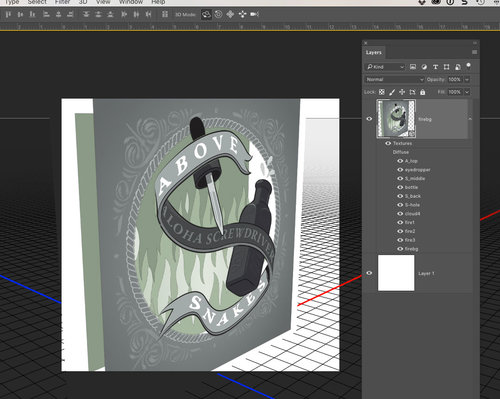
Once my layers were nice and simple, it was time to get into 3D. I selected all of the layers in the Layers panel and then chose "New Mesh from Layer" in the top menu's 3D drop down. The first option in the sub-menu is "Postcard". That's the special sauce that makes this whole thing work. When you choose "Postcard", it turns each of your selected layers in to a 3D Layer. After the computer thinks for a second, each of the layers will be marked with a small cube icon to remind you that it's a 3D layer.

You'll also notice that the tools panel will get a little smaller and the work area will have perspective lines going back into space. It's a whole new Photoshop that's just been there waiting for you to mess with. It's weird!


Step Four: Command+E

This is important enough that I thought it should be its own step. Basically, all of the layers need to be selected and then you have to hit Cmnd+E. This puts all of the 3D objects into one 3D Layer. Think of it like a deck of cards. This makes sure that all of the layers remain oriented to the same 3D space. After Cmnd+E is pressed, the computer will arrange the layers similarly to the way it arranged mine to the right. In addition to the "Layers" panel, you might notice that there's a "3D" panel with your layer names listed in reverse order. Make note of that panel for the next step.


Step Five: Move the Camera

The top item in the 3D panel is "Current View" and that's basically your movie camera. With "Current View" selected, you can begin to move the scene around with the Orbit, Roll, and Pan tools. Those are right up at the top of the screen in the top tool bar.

To get back to the default camera angle, open the Properties panel (Window>Properties). With "Current View" selected in the 3D panel, a number of different camera angle presets can be chosen from the "View" dropdown menu. If you're working on something really complicated and need to get back to a certain camera angle, you can even Save the position for later.

For my projects, I always choose the Orbit tool and move the camera to the upper right at an angle looking down. I even zoom out a little just to get enough room to start moving the layers around.


Step Six: Spread Out the Layers
By choosing the different layers in the 3D panel, I pushed and pulled the layers by grabbing the tip of the blue arrow. The green and red arrows allow for moving in the other directions as well. The handles just behind the arrows allow for the object to be tilted up/down or left/right. For the purposes of the demo, I just extruded the layers forward and backward in space.

It might be important to note that the layers in the 3D panel are listed from back to front, top to bottom.


Step Seven: Click the Anaglyph Button

It's really almost just that simple! Once your layers are extruded where you want them, change "Current View" to "Default" or "Front" in the Properties panel. The camera should then swing around to the front. In Properties, check "Stereo" and change the type to "Anaglyph". Depending on your file's resolution, you'll want to experiment with the Depth of Field settings. The best way to do this is trial-and-error while wearing red/blue glasses. Even better, with "Anaglyph" selected, Photoshop will stay in red/blue 3D mode while you made edits to the file. This is the biggest advantage of making anaglyphs this way. You can really adjust the layers to best effect and see it all while you work. AND you'll look super cool while doing it! Another great advantage of working this way is the ability to rotate your pieces left/right and forward/backward to create more interest. So, if you wanted to make a ramp or a slide, you could tilt a plane away from the camera. This is something that other methods can't do easily.

Step Eight: Details, Adjust, and Save!

Not all red/blue glasses are created equal. I found that I had to adjust the colors of my image to best fit the red and blue of my glasses. Sometimes adjusting the contrast can help too. If you want to dig a little further into the 3D environment, you'll quickly find that you can add light sources to your scene. I did this to add some shadows to the artwork. I think it really helped sell the depth. Maybe some things in your composition are see-through. It would be interesting to see how changes in transparency effects the depth.

I hope this tutorial helped. Making red/blue 3D is really fun for me it's just right balance of kitschy, arty, and nerdy. If you want to support more how-to blog posts like this and get some perks in the mail like pins and patches, consider supporting my Patreon campaign. I like Patreon a lot but if it's not your thing, maybe buy something from my shop! OR, if you see me in person, I accept high-fives and cheap beer. See you next time.Windows 10 License Key

2016年5月3日星期二

Adobe Photoshop Software Serial Number Free Download Full Version For Windows 7/8/8.1/10

Adobe Photoshop serial number Crack for windows is compositely multitasking application software whose primary purpose is swift amelioration of images and designs with its novel and innovative features.

This utility allows a creation of handy designs in fewer clicks, and it makes an approach to those assets faster. Being proficient raster graphics editor, it is filled with numerous tools and features for users’ advantage.

Also, this tool meticulously edits and composes images in many layers, meanwhile supporting many masks, alpha composition, color modeling comprising RGB, duotone and many more.

It is with wider support for file formats of all graphics, but it uses its file formats of PSD and PSB.


Tools of rotation and scaling for movement and extension of contents.
Layer comps with Focus Mask.
Correction of the lens automatically.
Automatic Alignment of layers.
Easily customizable healing and cloning.
Vanishing point.
Tools for fastest selection and refinement of edges.
Comfortable conversion of Black and White.
It competently manages assets in collaboration with Adobe Bridge.
Filters
Panel for Adjustments and Mask.

Adobe-photoshop crack

What’s NEW in Adobe Photoshop Portable

Adobe Photoshop licence key contains many newest features that ensure maximum performance and stability. For example, it’s one of the newer feature is a simplification of 3D models. Plus, a user can also experience its versatility with other features like the inclusion of color noise to make a perfect match of an original image. Not only this, you can now print 3D content comfortably.

Adobe Photoshop valid serial number CS 5
1330-1740-8054-9435-9293-7566
1330-1740-8054-9435-9293-7566

Adobe Photoshop CC registration code 2014
1045-1161-8441-2976-6784-9984

Adobe Photoshop System Requirement

Adobe Photoshop is effectively compatible with platforms and hardware specs

Adobe Photoshop For Windows
Windows 7.
Windows 8.
Windows 10.
Windows XP.
Windows Vista.
RAM: 2+ GB.

Hard Disk: more than 5 GB.

Adobe Photoshop For Mac:
Mavericks= 10.9
Yosemite= 10.10
RAM: over 4 GB.
Hard Disk: approximately 6 GB.

Read More:
Adobe Photoshop Elements 14 Product Key & Download
Adobe Photoshop Lightroom 6 Product Key & Download
Autodesk AutoCAD 2016 Product Key & Download
window 10 home product key
Windows 10 pro key
Windows 10 product key Windows 10 All in One 64 bits ISO Free Download
windows 2010 product key generato
window 8.1 product key

2016年4月19日星期二

10 Tips and Tricks for Retouching in Photoshop

10 easy ways to give your portraits a pro makeover. Learn how to banish spots, smooth skin, add digital make-up and more with my article. Over the next paragraphs I’ll show you how to take your portraits to the next level with 10 tried and tested techniques used daily by pro retouchers. You’ll discover how a few subtle but effective enhancements can make all the difference, whether you want to boost eyes, soften skin, remove spots, tighten waistlines or even add digital make-up.
1. Remove stray hairs

Stray hairs are one of those things that are easily overlooked when photographing a person. It’s only when you look at the image later that you realise how annoying and distracting they are. Taking a few minutes to remove the hairs and tidy up around the head will really help to give your portraits a professional polish. It’s very easy to do. Make a new layer, then grab the Clone tool and check Sample: All Layers in the Options bar. Choose a hard-edged brush tip and set Opacity to 100%, then zoom in close (hold down Cmd/Ctrl+Space then drag to the right to zoom).

Hold down Alt and click to sample a point in the background next to the stray hair, then paint over it. Continue around the head, varying the hair lengths so the results aren’t too uniform. To tidy up hairs that cross over the face, switch to the Spot Healing Brush tool, check Sample All Layers, and paint over the hairs.

2. Sculpt faces with the Brush tool

This is a really effective enhancement for adding depth and definition to a face. It works by selective lightening and darkening to accentuate facial features like cheekbones and jawlines. Hold Alt and click the Create New Layer in the Layers Panel to access the New Layer dialog box.

Choose Mode: Soft Light and check ‘Fill with Soft Light Neutral Color’ then hit OK. Grab the Brush tool, hit D to reset your colours to black and white, and 1 to set Brush Opacity to 10%. Paint with black over the shadow areas on the face and body, then paint with white over the highlights.

When you’re done painting, go to Filter>Blur>Gaussian Blur and set Radius to about 50px. This helps to make the effect look more natural.


3. Tidy up a face

There are three tools that any pro retoucher would be lost without: the Spot Healing Brush tool, the Clone tool, and the Patch tool. Used in combination, they can clean up marks, scratches and spots in seconds.

In CS6 and above, the Patch tool has been given a massive boost with a Content-Aware option.

This makes it similar to the Content-Aware Fill command, but the tool is more useful for retouching, What’s more, as with the Clone, Spot Healing Brush and Healing Brush tools, you have the option to Sample All Layers, which means that all your patching, cloning and healing can be done on separate layers.


4. How to remove hot spots

You know those shiny parts you sometimes see on a person’s face where bright lights are reflected?

They’re called hot spots. Not only are they distracting, they can also make a person look sweaty, even when they’re not. Nobody wants to look like a Sweaty Beauty, but If we remove the hot spots completely we’ll lose some of the shimmer that helps to define the face.

The solution is to tone them down with a combination of the Patch tool and the little-known but very useful Fade command.

Duplicate your layer then grab the Patch tool, if you’re using CS6 or above, choose Patch: Normal in the Options bar, then make a rough selection around the hot spot. Drag the selection to a clean area of similar tone to remove the hot spot completely. Next, press Cmd/Ctrl+H to hide the marching ants, then go to Edit >Fade Patch Selection (or press Cmd/Ctrl+Shift+F) and lower the Opacity to about 40% to reveal a toned-down hot spot.

5. Change Body Shapes

Every portrait photographer knows there are certain things you can do to make a person look slimmer.

For example, getting a person to lean forwards or shooting from slightly above the face will reduce double chins, crossing legs while standing or making an L-shape with the feet will lead to a more forgiving body shape, and shooting into the ‘dark side’, i.e. having your light source behind and to the side (see the image) will make a face appear thinner.

I know it’s a touchy subject, but slimming with Photoshop is just another method for making a person look their best. I’m not talking about huge shifts in body shape, but a few quick nips and tucks to reduce bulges, shrink chins and trim flab. The best tool for the job is the Liquify tool. It’s very easy to master.

Simply go to Filter>Liquify and use the Forward Warp tool to start moving pixels around. Of course, what you do depends on your image. Here, a quick tuck to the underarm bulge and the angle of the waistline, is all that’s needed.


6. Beautiful eyes

Most photographers will agree that  the eyes are the principal part of any portrait, so it pays to make a few subtle improvements to give them extra sparkle.

Here, we’ll concentrate on the essentials of eye enhancement, but if you want to take it further you can do a lot more – change the colour, add a catchlight, apply makeup, even make them larger. It can be useful to think of an eye as a set of four elements: pupil, iris, whites and lashes. Each element requires a different set of tools. I want to boost the tones inside the iris, darken the pupil and iris rim, lighten the whites and sharpen the lashes. Subtlety is key here, so don’t be afraid to lower the layer Opacity of any effect to tone it down.
7. Clarity Skin Smoothing

You may think of Camera Raw (plugin for Photoshop) as merely a Raw converter for your camera files, or a place to make a few tonal tweaks before opening your image into Photoshop. But delve a little deeper and you’ll find a host of incredibly useful tools and settings.

One such setting is the Clarity slider. When dragged to a positive value, the Clarity slider increases midtone contrast, which can be great for teasing out detail in your images. But drag it to a negative value, and you’ll get a wonderful softening effect that works brilliantly over skin. There’s a Clarity slider in the Basic Panel, but crucially, you can also use it in conjunction with the Adjustment Brush (which is another ACR gem) to confine the softening effect just to the skin.


8. Crop in and tilt

It’s best to get composition right in-camera, but when it comes to photographing people you’re often working with moving targets, which can make framing slightly more tricky. You’re also usually trying to coax an expression or reaction out of your subject, which means concentrating on what is or isn’t included in the frame may slip down the list of priorities. Luckily, with modern sensors being the size they are, we can get away with a bit of post-capture cropping in Photoshop.

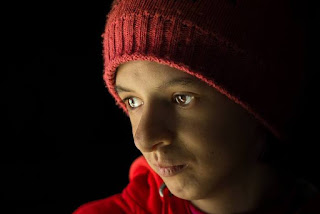
Cropping in tighter is something that you’ll see portrait photographers do time and time again, and a slight tilt to the frame when cropping will often result in a more pleasing angle. Tilting the head backwards towards their higher shoulder, like in this image, is seen as a more feminine angle, while a tilt forwards is more masculine. The Crop tool also offers a’rule of thirds’ guide – CS6 users can access further compositional guides via the View drop-down such as the Golden Ratio. For a classic composition, loosely position the eyes or face along one of the thirds.


9. Tone down eye bags

Day-to-day life takes its toll on your eyes. Unless you’ve spent the past month being pampered in a luxury spa with 10 hours of sleep a night, it’s likely that you’ll have dark circles under them.

As with most retouching techniques, we don’t want to remove eye bags completely, as this will look fake. We just want to tone them down.

Zoom in close to the eyes then click the Create New Layer icon at the bottom of the Layers Panel. Grab the Clone tool from the Tools Panel then go to the Options bar at the top of the screen. Choose Mode: Lighten (this means you’ll only replace areas that are darker than your clone source), set the Opacity to 20%, and set Sample: All Layers.

Hold down Alt and sample a clone source on the cheek directly below the dark area, then make a couple of swipes with the Clone tool to tone down the bag.


10. Skin smoothing using High Pass filter

Pro retouchers will often spend a few hours working just on a model’s skin, painstakingly removing every imperfection with the Clone and Healing tools.

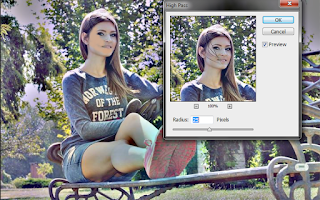
Of course, most of us don’t have the time or patience for such work, but luckily there are things we can do to cut corners. One of the best loved – not to mention fastest – skin smoothing techniques is the High Pass method. It gives your subject silky-smooth skin while still retaining some of the detail and texture. Therefore you don’t end up with the dreaded plastic look’ some methods can give. Instead, you get beautifully realistic smoothness.

If you want greater control over the strength of the smoothing effect, you could try applying a touch of Gaussian Blur (Filter>Blur>Gaussian Blur).

As the image is inverted at this stage, the greater the blur radius value, the more subtle the effect. When painting the mask, you don’t need to be too precise. A few quick strokes with a large, soft-edged brush should do the trick.


Conclusion

Before we get to an end, a quick note on workflow: we’ve all seen plenty of examples of portraits that have been overly retouched, so for ultimate control, in each tip the start point will always be to make a new layer or merge a new copy.

Now’s the time to learn two of the best keyboard shortcuts: Cmd/Ctrl+J to duplicate a layer andCmd/Ctrl+Shift+Alt+E to merge a copy.

Read More:
Adobe Photoshop Elements 14 Product Key & Download
Adobe Photoshop Lightroom 6 Product Key & Download
Autodesk AutoCAD 2016 Product Key & Download
window 10 home product key
Windows 10 pro key
Windows 10 product key Windows 10 All in One 64 bits ISO Free Download
windows 2010 product key generato
window 8.1 product key

Create an Underwater Dreamscape in Photoshop

Learn how to emotional photo manipulation of an underwater dreamscape with Photoshop. In this tutorial, you’ll learn how to create a fantasy underwater scene, place a girl in the dreamscape, then complete it with some bubbles. Throughout the tutorial, you’ll learn techniques that will help you create better matte paintings and photo manipulations.What you’ll be creating
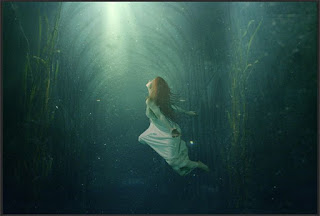
On this tutorial we will create an emotional scene of a girl in an emotional underwater dreamscape. We will use some essential techniques in doing photo manipulation. We will use masking, brush tool, some filter, color adjustments and textures all through the steps in this tutorial. Use Adobe Photoshop CC to fully follow this tutorial. Some filter used in this tutorial will not be available in photoshop CS. Don’t forget a glass of coffee and optionally a pack of cigarette for your companion. Ready..?
Tutorial Resources
  •     Girl – lockstock
  •     Underwater – koko stock
  •     Cathedral – kippa2001

Step 1

Let’s start by creating a document by opening the underwater image in photoshop (Ctrl+O). This image will be background layer in the document on which we will create the scene.

 step1a

Change this background layer into a new layer by double clicking the background thumbnail to show the new layer pop up window. Name this layer, say, underwater.


We need to alter the direction of the image by positioning the light rays on the left side. To do this, hit Ctrl+T to activate the free transform tool. Right click on the image to show free transform option box. Choose flip horizontal.


Finally, go to image > image size. Alter its size to 1800 pixels wide and 1200 pixels high.

Step 2

Add the cathedral image into the document by hold-clicking and dragging the image from the folder in our PC where we have saved it to the open document in photoshop.


Change this cathedral layer to overlay blending mode. Scale its size to the size needed and move it to the position where the ceiling is on the light rays.


Finally, set the opacity of this layer to about 20%.


We need to hide some parts of the cathedral image. We will give this layer a layer mask. Go to layer > layer mask > reveal all to give it a layer mask. Take brush tool (B) and choose a very soft round brush (0% hardness) set to about 15-20% opacity. With black color, stroke the brush on areas around the window, lower parts and left side of the building, and the ceiling a bit as well to mask them. The red highlighted parts are area covered with mask.


Here is the result after being masked:


Step 3

Now we will alter the color of the underwater by giving it a bit blue tone. Create a new layer above the cathedral layer (Shift+Ctrl+N). Name this new layer, say, gradient. Set the foreground layer to #abd9f1 and background color to #3d87cb. Activate gradient tool (G) and choose foreground to background linier gradient. On this new layer, hold-click and drag the tool from the middle top point downward to the bottom to create gradient.


Set this gradient layer to soft light blending at 75% opacity.


Step 4

Next we will add water texture to the scene. Create a new layer above the gradient layer. Name this layer, say, texture. Set the foreground color to blue #155ea5 and background color to #a0d2ec. Go to filter > render > cloud to fill this layer with cloud.


Go again to filter > other > minimum to give this layer minimum filter.

Set this layer to soft light blending at low opacity 0f 20%.
Step5

Proceed to add a model to the scene. Open the model image. Take the pen tool (P). With the tool, cut out the model from the image.


Step 6

Add the cut out to the main scene. Scale its size to the size as much as it is proper. Position the model in the middle of the scene under the light rays.


Step 7

In the next several steps we will create hair to the model. Firstly, take pen tool (P) and create paths. The paths given in the screenshot is just example, so we might not exactly create the same paths as given example.


After creating paths, be active in path panel (window > path). Open the path menu, and choose save path.


Now we have path saved as path 1. We need to save this path to re-use it in the next steps.


Create a new layer (Shift+Ctrl+N) above the model layer on which we will paint the hair. Name this layer, say, hair 1. Make sure to set the brush tool (B) to round brush with size of about 7 pxls at 0% hardness and 100% opacity. Set the shape dynamics of the brush to Pen Pressure control in the brush panel (F5). Set the foreground color to #1e1210. Now open the path menu and choose stroke path. Use brush tool to stroke the paths and check simulate pressure.


Duplicate the hair 1 layer. Move the duplicate to the lower position at the model’s back. Take free transform tool (CtrlT) and warp the duplicate layer to alter its shape.


Select the original hair 1 layer and give it a layer mask (layer > Layer mask > reveal all). Mask some hair in red highlight.


Mask the duplicate layer as well to hide the hair on the left arm.


Step 8

Create another new layer (Shift+Ctrl+N) between the original hair1 and duplicate layer. Name this layer, say, hair 2. Using given paths, paint highlight of the hair by stroking the paths. Use the color of #8e2c10.


Set this layer to normal at about 8-10% opacity. This will give reddish brown highlight to the hair.

Step 9

Now create again a new layer above all the other hair layers. Name this layer, say, hair 3. With smaller brush with size of 3-4 pxls and color #662f16, stroke the path to paint more highlight.


Given this amount of color, set this layer to normal at 5-7% opacity. This will give more highlight to the hair.


Step 10

Finally, create another new layer above the hair 3 layer. On this layer, stroke the same paths with smaller brush of 1 pxls with lighter brown color.


Given this amount of color, set this layer to normal at about 15% opacity.


With the similar way, create more hair strands to the model.


Here is the result so far. Select the model and all the hair layers. Hit Ctrl+E to merge them into a single layer. Name this new layer, say, model.


Step 11

Proceed to give this model some retouching on the skin and dress. Go to filter > camera raw. Prior giving it the filter, convert this layer into smart object by going to layer > smart objects > convert to smart object. Use the value below:


Given this values, the result should be like this:


Hide the effect of this filter on areas around the hair by masking the filter.


Step 12

Now we will do some color adjustment to the model to make it be well blended with the whole scene. Firstly, we give it a new fill layer with a clipping mask. Go to layer > new fill layer > solid color. Use color of #01848c.


Set this solid color layer to soft light at 100% opacity.


Mask this layer on areas around the hair. Use a very soft round brush (B) set to about 20% opacity with 0% hardness.


Step 13

Give another color fill layer with a clipping mask. Use color of #0d6b6a. set this layer to soft light at about 40% opacity.


Step 14

Next, create a new layer with a clipping mask above the two color fill layers. Name this layer, say, texture 2. Give this layer cloud filter (filter > render > cloud). Use the color as given in the screenshot.


Give this cloud layer another filter: minimum (filter > others > minimum)


Mask some part of this layer on areas in red highlight.


Step 15

Now duplicate the underwater layer. We will use this duplicate as the texture for the model. Move the duplicate layer above the texture 2 layer. Give this layer a clipping mask (Ctrl+Alt+G).


Set this duplicate layer to normal at about 45% opacity. Mask this layer on areas around the face and shoulder as indicated in red highlight.


Step 16

Create another new layer above all the other layers (Shift+Ctrl+N). Name this layer, say, highlight. We will add some highlight to the model. Set this layer to overlay filled with neutral color, 50% grey (#808080).


Take a very soft round brush tool (B) and with white color paint highlight on areas around the face, arms and dress. Here is the layer set in normal blending.


Here is the result in overlay blending at 100% opacity.

We can duplicate this layer to define stronger highlight.


Step 17

Now select the model later. Go to layer > layer mask > reveal all to give this layer a layer mask. Mask areas on the model’s dress and hair and other parts around where needed.


Step 18

Next we will add some highlight on the building. Create a new layer again above all the other layers. Name this layer, say, highlight 2. Set this layer to soft light. Paint the highlight on areas around the building. This is the layer will look in normal blending at 100% opacity.

And given this amount of color, the result should be like this:


Step 19

Finally, we will set the overall color adjustment to the scene. Create a new fill layer above all the other layer (Layer > new fill layer > solid color). Use color of #0d6b6a. set this color fill layer to soft light at about 60% opacity. Mask this layer on areas around the light rays as indicated in red highlight.


Step 20

Give another new fill layer. Use color of #070816.

Set this layer to exclusion blending at 100% opacity.
Step 21

Now go to layer > new adjustment layers > brightness/contrasts to give the whole scene brightness/contrasts layer.


Mask this adjustment layer on areas highlighted in red.


Step 22

Give another adjustment layer: selective color. Set this layer to normal blending at about 70% opacity.


Step 23

Finally, give the scene a new adjustment layer again: gradient map.


Set this gradient layer to normal at about 35% opacity. Mask area around the middle of the scene as shown in the red highlight.


Step 24

We are almost done! We will add some bubbles around the model as indication of the model’s movement in the water. We will create bubble custom brush first. Create a new document (Ctrl+N) with size of about 500 pixels high and 500 pixels wide. Take ellipse tool (U) and create black spherical shape. Don’t forget to hide the background layer by clicking the eye icon next to this layer.


Mask the shape as indicated in red highlight. Right click on the shape layer in the layer panel to show the layer option and choose rasterize layer.


Finally go to edit > define brush preset. Name this brush, say, bubble.


Step 25

Next, we will add some bubbles to the scene. Create another new layer below the brightness/contrast layer in the main document (step 21). Load the bubble brush previously created. Open the brush preset (F5) and set the brush stroke.


On this new layer, paint the bubble using the color of #76b2be. Try to vary the brush size to create various sizes of bubbles.


And finally, select the topmost layer and hit Shift+Ctrl+Alt+E to merge all the visible layers into a single layer. Name this layer, say, final. Go to filter > sharpen > unsharp mask to sharpen the final result a bit.


Final Resultsfinal result


Download the PSD  :Underwater.zip | 53.1 MB

Read More:
Adobe Photoshop Elements 14 Product Key & Download
Adobe Photoshop Lightroom 6 Product Key & Download
Autodesk AutoCAD 2016 Product Key & Download
window 10 home product key
Windows 10 pro key
Windows 10 product key Windows 10 All in One 64 bits ISO Free Download
windows 2010 product key generato
window 8.1 product key